
After starting on a new programming project I needed some way to have the application persist data between sessions. I eventually found SQLite, and the enthusiasm grew as I found out that there is an EntityFramework provider for this. Microsoft has even went a step further and made an EntityFrameworkCore implementation, which even supports migrations (albeit limited). When I saw that EntityFrameworkCore was supported even in regular .NET applications I reached peak enthusiasm and decided that this was my path. I eagerly started reading Microsoft's "Getting started" documents, and almost immediately ran into problems. The migrations described in the previous link all mention running "dotnet ef" commands. The problem is that the documentation doesn't specify where to execute those commands. And when I finally found out that they should be executed in a PowerShell, they didn't even work and threw the following error:
No executable found matching command "dotnet-ef"
There are a lot of results on Google and StackOverflow about this, and they all touch on the same subject, but no one post gave the complete picture, and many of them even contradicted each other... not to mention that most of them were obsolete and targeted the pre-release versions of EntityFrameworkCore. It turns out you don't even need to use the "dotnet ef" command when creating regular .NET Framework libraries and applications, as it is only meant for .NET Core. So, after hours of trial and error I finally managed to get it working like you would normally use EntityFramework. That's when I decided to write down my recipe for success so that I can look at that the next time I need to use SQLite and EntityFrameworkCore. Hopefully this will turn up in search results to help other people as well.
Create the project(s)
Open Visual Studio 2017
Create a new project (File > New > Project) I usually create Windows applications, so I'll create a new "WPF App (.NET Framework)", but this should also work with a "Console App (.NET Framework)"
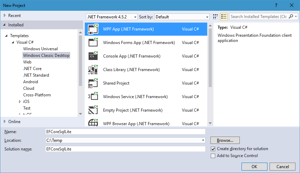
I prefer to have all database related functionality in a separate project, so I have also created a "Class Library (.NET Framework)".

Now, go to "Manage NuGet Packages for Solution"
Add Microsoft.EntityFrameworkCore.Sqlite to "Database" project
Add Microsoft.EntityFrameworkCore.Tools to "Database" project
Add Microsoft.EntityFrameworkCore.Design to your main WPF project
Accept the licenses for all the steps above.
Create a new class in the "Database" project called "MyDatabaseContext.cs"
Add your database models. These should really be added as separate files, but I'll add them to the same file for the sake of simplicity. In this case I have created a model called "Person".
Add your database context class and inherit from DbContext.
Override the OnConfiguring method and put the name of the database file you want to use. In this case a file named "MyDatabase.sqlite" will be created.
The "MyDatabaseContext.cs" file should now look something like this:
public class Person
{
    public int Id { get; set; }
    public string Name { get; set; }
}

public class DatabaseContext : DbContext
{
    public DbSet<Person> Persons { get; set; }

    protected override void OnConfiguring(DbContextOptionsBuilder optionsBuilder)
    {
        optionsBuilder.UseSqlite("Data Source=MyDatabase.sqlite");
    }
}
Create database and set up migrations
Your project is now complete and it's time to create the database and set up the migrations.
Open NuGet Package Manager Console Tools > NuGet Package Manager > Package Manager Console
Make sure that your "Database" project is selected in the "Default project" combobox
Also set your "Database" project to "Set as StartUp Project"
Run the following command in the console: Add-Migration InitialCreate
If you get an error saying "Could not load file or assembly 'Microsoft.EntityFrameworkCore.Design' or one of its dependencies. The system cannot find the file specified." you have simply forgotten to do point 4.4 above
This will create a folder in the "Database" project called "Migrations"
Starting your application at this point will accomplish nothing. You still have to tell your application to create the database and perform any pending migrations so that the database is up-to-date.
Open your App.xaml.cs file in your WPF project and add this the the App constructor. If you are using some MVVM framework, put the code in the appropriate place.
using (MyDatabaseContext dbContext = new MyDatabaseContext())
{
    dbContext.Database.Migrate();
}
You can now compile and start your project. Remember to set your regular project back to "Set as StartUp Project".
Go to the bin\debug folder in your WPF project, and you should have a file named MyDatabase.sqlite
For extra verification you can open the database and have a look. I use a tool called SQLite & SQL Server Compact Toolbox. Just create a new connection, browse to the file that was created and open it, and you should see something similar to this:
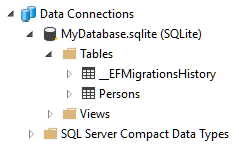
And that's really all there is to it! If you need to create additional migrations just repeat the steps in "Create database and set up migrations" and additional migrations should be created and automatically applied! Download a working solution here