
A colleague wrote this blog post on how to deploy a Sitecore Helix solution without using gulp, which sounded like a good idea. However, me being me, I didn't much care to open a package manager console and writing commands every time I wanted to publish the entire solution, so I came up with this alternative that (seemingly) integrates more with Visual Studio, and you only have to publish the main site project to also publish all the other projects.
Prerequisite
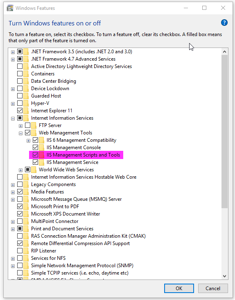
The prerequisites for my variant is a bit simpler and it only requires that IIS Management Script and Tools must be enabled from within "Turn Windows features on or off":
Install script
Now you can copy the PowerShell script and config file from my GitHub repository and put it somewhere in your Helix solution.
Configure script
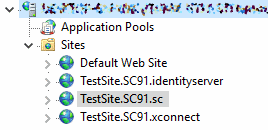
Now, edit the configuration file and change the siteName variable to have the same name as your Sitecore site in IIS; in my case, the site name is "TestSite.SC91.sc"
Hook script into Visual Studio
Select the main web project in your Solution Explorer, right-click it and choose Unload Project. Now right-click it again and choose Edit [projectfile].csproj. All the way at the bottom of the .csproj file you should see some commented markup saying "To modify your build process [...]". Paste the following markup after this comment:
<Target Name="PublishAll" AfterTargets="CopyAllFilesToSingleFolderForPackage">
<Exec Command="powershell.exe -NonInteractive –ExecutionPolicy Unrestricted -command "& { &'$(SolutionDir)Configuration\PostPublish.ps1' -solutionPath '$(SolutionDir)' } "" />
</Target>Make sure that you point to where you copied the script. In my case the script is in a folder called "Configuration" directly in the solution folder. What this markup does is hook into the publish pipeline in Visual Studio. This pipeline is a bit limited when it comes to publishing to the file system, as one normally does during Sitecore development, as stated by Microsoft:
We currently do not support executing custom targets after publish from VS for the file system protocol.
So what we have done is hook into the pipeline that executes just before the main project will be published. This means that Visual Studio will first build the main project, then it will execute the publishing script, and finally it will publish the main project. This shouldn't cause you any problems. Once you have added the above markup to your main project and reloaded it you can test it by doing a publish of the main project, and you should see the PostPublish.ps1 file be executed in the Output window.
Conclusions
If we look into the PowerShell script file itself we can see that it gets all neccessary IIS paths on its own, and that it only publishes projects that reside in folders named "Feature" or "Foundation" (If you use other folders in addition to the recommended Helix structure you need to edit the PowerShell script and duplicate the bottom section). A nice effect of this is that you do not have to create separate publish profiles for your Feature and Foundation projects! One thing I didn't include from my colleague's script, though, is the automatic Unicorn sync. This was because I usually know when I need to do it (just use the "Sync all" functionality from within Unicorn), and I don't want to wait for a sync every time I publish.