
xConnect as publishable project, Part 1 (Models)
I’m sure Sitecore had their reasons for separating out facets and other info into xConnect instead of using MongoDB, and for all intents and purposes this works fairly well.
However, as I’m sure you have found out, it takes a bit more configuration to get xConnect to work. When you create a new facet you need to update at least four files, and the documentation isn’t always very clear.
What we ended up doing on a project we were working on at the office, and which I have also included in my demo solution on GitHub, was to have a separate application that gathers all the information and creates the necessary files for you. These are copied to another web project in the solution that contains the files necessary for xConnect. This separate application is set up through a Build Event to execute itself whenever it is built.
This way, whenever we update our xConnect model we can just rebuild the separate application, which copies the required files to the xConnect web project. Finally we publish the xConnect web project and xConnect will know about our new model.
Seeing as this is set up as a build event there’s no stopping you from setting the application as a build event on another project if you feel that is more appropriate for your build pipeline.
There is yet another advantage about this setup: When you have an xConnect web project in your solution, you can also add this to your preferred source control. This way you can track changes in the xConnect website, and other developers will automatically get your changes as well. So when you create a new model and generate new files for the xConnect web project, other developers can simply publish their xConnect web project and get your new model without having to think about all these files.
But enough with the theory, lets see how you can make this happen in your own solution.
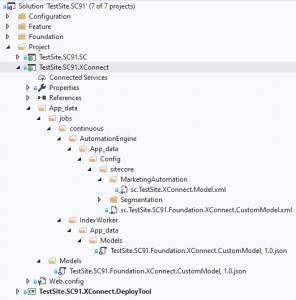
Project setup

DeployTool is marked as a “Startup project” so that I can easily start/debug it by pressing F5 in Visual Studio
First, if you are using Helix, create a new web project in your “Project” folder. Otherwise place it wherever you feel like it belongs in your solution.
Second, create a new console application. In a Helix solution this too belongs in the “Project” folder. Remember to add a project reference to where your xConnect model is defined to this console project.
As to prevent this blog post from becoming too big, you can copy the “DeployTool” from my demo solution on GitHub, and I’ll take your through the functionality of it.
The first thing you’ll see in Program.cs is the validation of input arguments to the DeployTool. You can either send in the path to your xConnect web project manually as a regular argument, or the DeployTool can read the path from a separate file.
The reason for using a separate file is to make it possible to use the macros in build events.
The build event for DeployTool is as follows:
echo $(SolutionDir)Project\TestSite.SC91.XConnect > "$(TargetDir)XConnectPathArgs.txt"
"$(TargetPath)"
This will use the $(SolutionDir) macro so that you don’t have to hardcode a specific path. Other developers might not have the solution in the same folder structure on their harddrive!
The path is then written to the file read by DeployTool (where $(TargetDir) is the path to the resulting DeployTool.exe), and finally the DeployTool itself is started.
Or course, if you set up Deploy tool build events on other projects, the $(TargetDir) must be replaced by the path to the deployment tool. For example: “$(SolutionDir)Projects/TestSite.SC91.DeployTool/$(OutDir)”
The DeployTool then executes a task to export the xConnect model. You will also see there is a task called Tasks.AutomationRules. The functionality of this will be covered in Part 2.
The most important part of Tasks.XConnectModel.Export() is on line 14:
string json = XdbModelWriter.Serialize(CustomModel.Model);
This is where you reference your own custom xConnect model, so replace “CustomModel.Model” with your own namespace and model name!
The rest of the code is where the magic happens and you don’t need to change anything else in it, but if you want to you can replace “TestSite” with whatever your solution is called.
One important caveat! The files whose names start with “sc” must start with “sc”, so do not change this prefix!
Basically it copies the generated JSON file to the required xConnect folders, and it creates some XML files for the AutomationEngine and copies them to the correct paths.
Now, whenever you build DeployTool, it will also be executed. It will use the xConnect web project folder name set up in the Build Event, and it will copy JSON and XML files into this web project.
The files generated from the DeployTool should now be included to the xConnect web project in Visual Studio (“Add > Existing item”). You can then finally publish the web project to wherever your xConnect site is running. After a publish I usually do an “iisreset” from an administrator command prompt to make sure all the Sitecore sites are restarted with the new xConnect values.
In the future, whenever you add or delete something from an xConnect model, or create new or remove old models, you can simply rebuild the DeployTool project (or the project you have a build event on) and publish the xConnect web project, and xConnect should happily acknowledge your new model definitions.
The occasional (and almost inevitable) XDB exception
Sometimes you may see this exception in your log files, especially if there are multiple developers working on the same solution:
18932 00:00:13 ERROR Exception when executing agent aggregation/pathAnalyzerLiveAgent
Exception: Sitecore.XConnect.Client.XdbModelConflictException
Message: One or more local models conflict with the xDB service layer.
‘TestSite.SC91.Foundation.XConnect.CustomModel, 1.0’ does not match the remote version
Source: Sitecore.Xdb.Common.Web
at Sitecore.Xdb.Common.Web.Synchronous.SynchronousExtensions.SuspendContextLock[TResult](Func`1 taskFactory)……
This exception will probably fill up your log file and look very scary, but if you look at what it actually says it suddenly becomes less intimidating.
It basically says the the xConnect model used by your Sitecore site does not match the xConnect model used by the xConnect site.
This usually happens when a developer switches to another development branch and publishes the Sitecore web project, but forgets to also publish the xConnect web project.
The solution is then simply to publish the xConnect web project, and the exception should go away.
Of course, if you do not use DeployTool and a web project for xConnect files, you would have to go through all these files manually to find out where something is wrong, which is a much more tedious process.
So in this regard, the DeployTool also helps you with easier maintenance. Win-win :)
In part 2 of this series I’ll talk about automating deployment of your custom rules and segmentations.